17.2 Loops
QF-Test provides two different kinds of nodes loops:
- Loop nodes execute their child nodes for a certain number of times. However, you can leave the loop any time using a Break node.
- While nodes execute their child nodes until a certain condition becomes false. Again, you can leave it any time using a Break node.
Note
Loop nodes will always stop after the given number of times.
In the case of While nodes, however, you need to make sure that the condition
will become false at some point. Otherwise you would have an infinite loop. In
interactive mode you can always stop execution by hitting the pause button
![]() .
In batch mode you would have to kill the QF-Test process. (You start QF-Test in batch mode
using the command line parameter
.
In batch mode you would have to kill the QF-Test process. (You start QF-Test in batch mode
using the command line parameter -batch. Then QF-Test does not start its UI
and just executes the given test suite.)
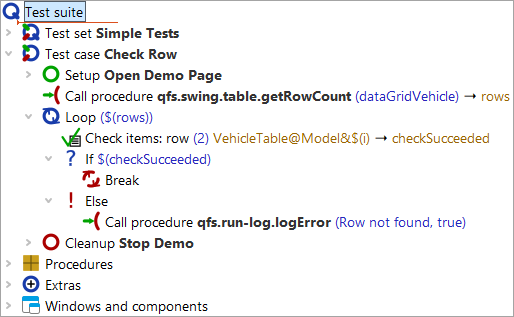
In the following exercise, implement a test case checking whether a certain row is displayed in the table of the CarConfig application.
The actions of the test case will be:
- Determine the number of rows the table has.
- Loop over all rows and check if it is the row you are looking for.
- Break the loop when a match was found.
- Write an error to the run log if the row was not found.
Please start with recording a check on the row of interest:
-
Action
Activate the check recording mode by clicking the toolbar button

- Right-click a row in the CarConfig application and select the menu item »Row« from the popup menu.
-
Stop the recording by pressing
 .
.
- Change the name of the recorded sequence to e.g. 'Check row'
- Turn the recorded sequence into a test case by right-clicking it and selecting the submenu item »Transform node into«-»Test case« from the popup menu.
In general, QF-Test allows you to add nodes very efficiently by packing one node into another one:
- Action Open the test case node and pack the recorded Check node into a loop by right-clicking it and selecting the submenu item »Pack nodes«-»Loop« from the popup menu.
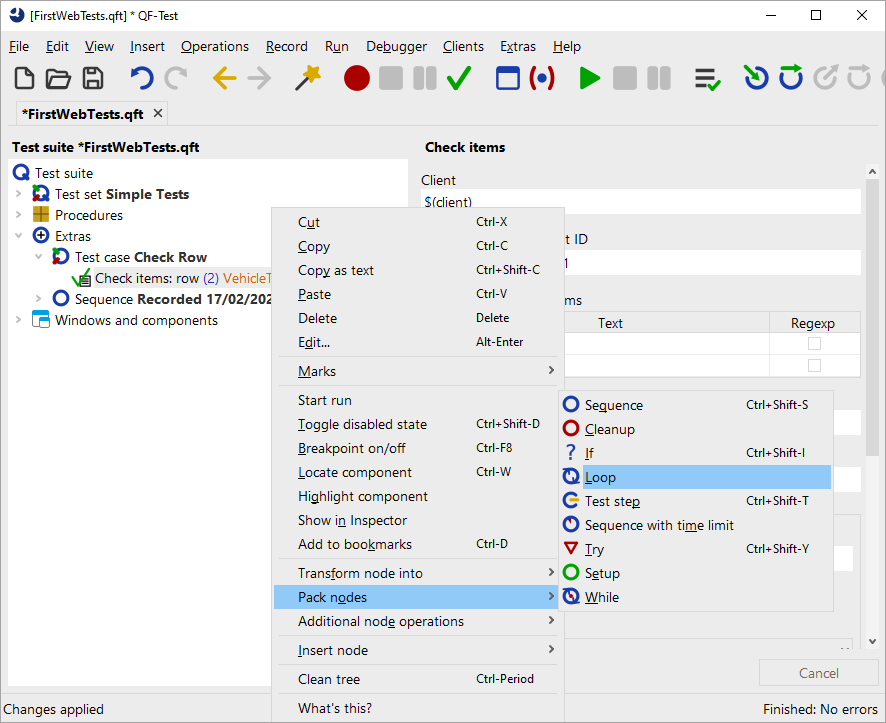
QF-Test evaluates dynamically which nodes may be packed into one another and only presents the appropriate ones. So, in case you do not find the 'Loop' submenu item make sure you have right-clicked the correct node. The same holds true for the 'Transform node into' and 'Insert node' methods.
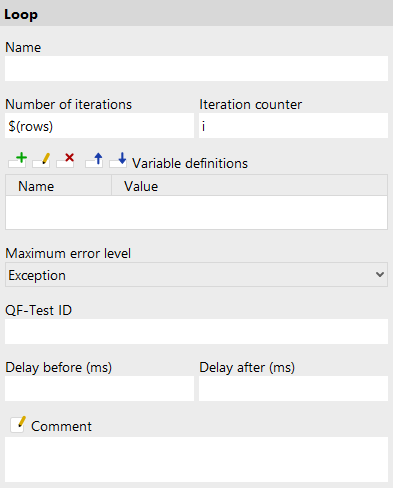
In the next series of actions set the value for the Number of iterations
attribute of the Loop node. To do so, find
out how many rows the table has. There is no simple node for this.
However, the last chapter showed that the standard library provides
a lot of extended functionality. Insert the procedure getRowCount
from the package qfs.web.table in the standard library.
- Action Select the Test case node and press Ctrl+A
-
Press the 'Select procedure' button
 left to 'Procedure name'.
- Click the tab 'qfs.qft' in the 'Select procedure' dialog.
- Navigate to 'getRowCount' in the package 'qfs.web.table'
- Click 'OK' to select it.
Adding a procedure via Ctrl+A was described in Manual creation of procedures. If you would like to check with the screenshots, look there.
-
Action
Enter the variable name
rowsin the Variable for return value attribute. -
Change the default value for the
idin the variable definitions table to the QF-Test component ID of the table, i.e.VehicleTable. - Select the Loop node.
-
Enter a reference to the variable
$(rows)in the Number of iterations attribute of the Loop node. -
Enter the name of an iteration counter, e.g.
iin the respective attribute of the Loop node.
In the next series of actions change the recorded row index to the iteration counter and add a variable for the result to the details of the Check node. Then add an If node after the Check node evaluating the result, with a Break node within to quit the loop when the row was found.
- Action Open the Loop node.
- Select the Check node.
-
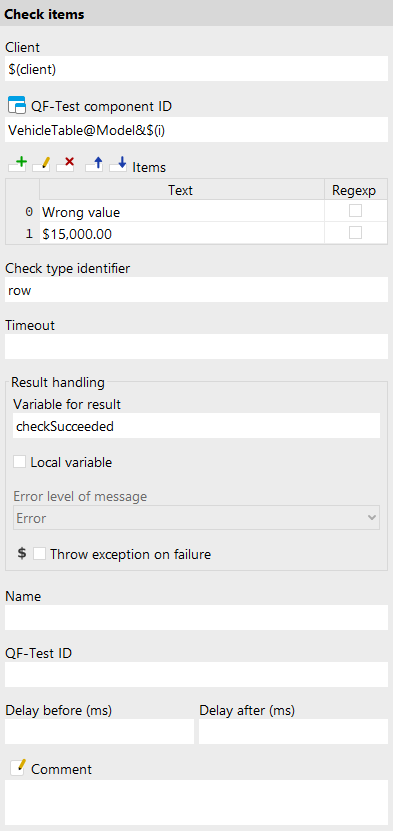
Change the recorded row index of the QF-Test component ID to the iteration counter
$(i). The QF-Test component ID should now readVehicleTable@Model&$(i) -
Enter the variable name
checkSucceededin the 'Variable for result' attribute. - Right-click the Check node and the submenu item »Insert node «-»Control structures«-»Break« from the popup menu.
- Pack the Break node into an If node by pressing Ctrl+Shift+I (Of course you can also pack it via the menu).
-
Type
$(checkSucceeded)in the 'Condition' attribute of the 'If' node.
The variable checkSucceeded will be set to either true or false by the
Check node so that the reference to the variable $(checkSucceeded)
is all that needs to be entered in the
'Condition' attribute of the If node.
In the next series of actions add an Else node as the last node in the Loop node. It will only be entered if all repetitions of the loop were executed, which means the row was not found and the check never became true.
- Action Collapse the If node if it is open. This is important because otherwise the Else node would belong to the If node and not to the Loop node.
- Right-click the If node and select the submenu item »Insert node «-»Control structures«-»Else«.
- Open the Else node.
-
From the standard library insert the procedure
logErrorcontained in the packageqfs.run-logas described above. -
Type
Row not foundin the value field ofmessagein the Variable definitions table. -
Change the value of
withScreenshotsin the Variable definitions table fromfalsetotrue.
When you run tests in batch mode screenshots are a great help for analyzing
errors. On the other hand a great number of screenshots lead to a big log-file.
This is why the default value for withScreenshots is false.
Last, complete the test case with Setup and Cleanup nodes and move it into the top part of the test suite.
- Action Copy the Setup and Cleanup nodes of 'Test set: Simple Tests' into the new test case as the first and last node.
- Move the test case from the Extras section into the top section of the test suite after the 'Test set: Simple Tests' node.
This is what the new test case would look like:
- Action Execute the new test case.
It should run without error.
-
Action
Then modify a value in the
details of the Check items node, e.g. change the name of the car
to
Wrong value.
- Action Execute the new test case again.
This time the Else node should be entered and you should get an error message.