QF-Test has always been about reliable, maintainable test automation for web, desktop, Java-based, and mobile applications. With the new AI integration in QF-Test 10, you can enhance your tests with AI-driven insights — and the best part is, you don’t need to rely on cloud services. In this post, we’ll show you how to connect QF-Test to a locally running, free AI model using Ollama, so you can start experimenting with AI-enhanced testing right on your own machine.
Step 1: Set up Ollama
To get started, you’ll need to install Ollama on the machine where your tests run. Ollama provides free, locally hosted AI models that powerful enough for the more basic parts of QF-Test’s AI integration.
- Download and install Ollama from the official website: https://ollama.com/ (You don’t need any account).
-
Start the Ollama server by opening a terminal and running:
bash ollama serve -
In another terminal, download a model, which typically is a couple of gigabytes:
bash
ollama pull llama3.2
By default, Ollama will host the model at http://localhost:11434 as long as ollama serve is running. You can now use this endpoint in QF-Test to send AI requests locally — no internet connection required.
Step 2: Configure QF-Test to Use the Local AI
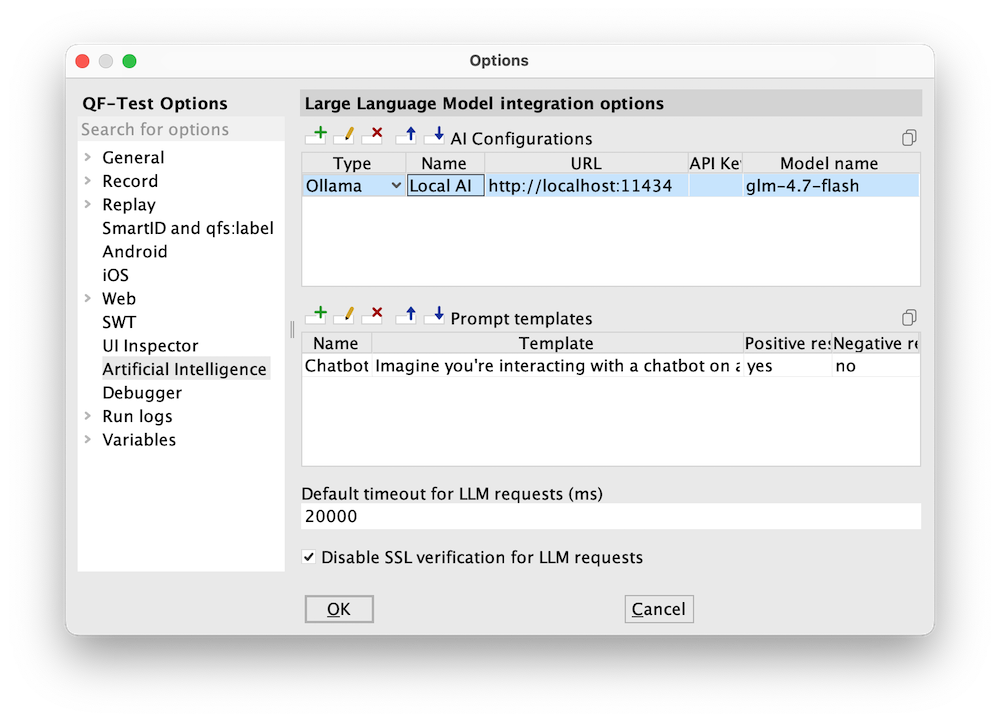
You can connect the Ollama server to QF-Test convieniently via the QF-Test Options dialog, accessible via QF-Test → Options → AI Integration. Click the “plus” icon to add a new row to the “AI Configurations” table and enter the model details:
- Type: “Ollama”
- Name: “Local AI” (or whatever you like)
- URL: “http://localhost:11434”
- API key: “” (leave blank)
- Model name: “llama3.2” (the name of a model you added to Ollama via
ollama pull)
QF-Test also makes it easy to integrate an AI model via the ai scripting module, if you prefer the scripting approach.
Here’s a minimal example of a server script that connects QF-Test to your locally running Ollama model:
// Configure the AI model
ai.setDefaultConfig("Ollama", "http://localhost:11434", "", "llama3.2", displayName: "Local AI")

// Make a request to the AI and print it to the terminal
print(ai.ask(
  "What is the answer to life, the universe and everything?",
  configName: "Local AI"
))
Let’s break down what’s happening:
-
ai.setDefaultConfig(...):
This line registers the model with QF-Test. You specify:- The type of endpoint (“Provider”) to use (
Ollama) - The local endpoint url (
http://localhost:11434) - An empty string for the API key (not needed for local models)
- The model name (
llama3.2in our case) - A friendly display name (
Local AI) for use in the UI ai.ask(...):
This line sends a prompt to the AI model. TheconfigNameensures it uses the local configuration we just defined. The result is returned directly and printed in the QF-Test terminal.
- The type of endpoint (“Provider”) to use (
Step 3: Use AI in your tests
Beyond this toy example, you can now leverage your local AI model directly in your test cases:
-
Check Text with AI
The AI integration can be used in a Check Text with AI node. This is perfect for situations where you want QF-Test to validate text in your application UI dynamically. For example, you could check if a text matches a natural language description or even check if it’s in the expected language. To learn more, see the documentation here: Check Text with AI node -
AI Scripting Module
For advanced automation, theaiscripting module gives you full programmatic control over AI requests in QF-Test: AI scripting module documentation
The advantages of running locally
Running a local AI model has several advantages:
- Privacy: Your test data never leaves your machine.
- Performance: Local inference can be faster than cloud requests.
- Cost-free: No API subscription needed for experimentation.
By combining QF-Test’s robust automation framework with AI insights, you can enhance your tests, automate language checks, or even generate test suggestions — all without leaving your enterprise environment.
What’s next
Once you have your local Ollama model running and integrated with QF-Test, try experimenting with:
- Natural language validations in your test cases
- Dynamic data generation for forms
- Multilingual text checks
For more details on all AI integration options in QF-Test, check out our free special webinar “When tests become intelligent: AI-driven checks with QF-Test”:
[[qf.Preview(videos/2026-03-02-special-webinar-ai-checks)]]
With just a few steps, your tests can now become AI-aware while staying fully under your control. It’s time to explore the power of combining QF-Test with local AI models!