19.1 Getting started
To create your first tests for the accessibility of your website, we recommend the Setup sequence creation – The Quickstart Wizard. Under "A web application including accessibility checks", you can
create an accessibility test in just a few steps.
First, define the URL of the web page to be tested.
Note The quickstart wizard creates a test that checks the accessibility of a specific page. Using features such as Data driver you can easily run the tests across multiple different pages.
In the "Accessibility - Module selection" step, you can configure which tests to run.
A more detailed description of the accessibility checks and their configuration options can be found in
the respective subsections in the following sections.
Under "Optional," you will find configuration options for the browser,
web frameworks, and other options, which are described in detail in
Web testing.
Click "Finish" to confirm the entered data and create the accessibility test.
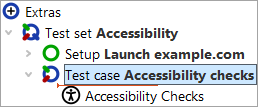
The generated test suite consists of two components:
The setup starts the previously specified browser (if necessary), navigates to the defined web page,
and establishes the basic component recognition. Working with web components is described in
Install CustomWebResolver node – Syntax
and can be adapted to your needs.
The generated test case includes an Accessibility Checks node, which, when executed, runs the specified
accessibility tests according to the configuration made in the quickstart wizard.
Detailed information about the configurable parameters can be found in
Configuring the "Accessibility Checks" node.
The different accessibility tests are described in the following sections.