 Vidéos
 Blog QF-Test
 Manuel
 Tutoriel
 FAQ
FAQ
QF-Test offers floating licenses to give you maximum flexibility at a low cost, but these are limited to sub-networks. That is why we provide the QF-Test license server: it enables centralized license management across subnet boundaries – even across different time zones – so your teams can work seamlessly wherever they are.
We strongly recommend running the QF-Test license server as a Windows service. This ensures predictable startup, resilience after reboots, and simple operations for both technical and non-technical stakeholders.
What is a license server and why does it matter for test automation?
A license server manages shared licenses for software like QF-Test, enabling multiple users and systems to use the product without installing separate licenses on every machine. For test automation teams, this central control ensures:
- Efficient use of concurrent licenses across QA engineers and CI systems
- Visibility and control for administrators
- Reduced friction for testers and developers who just need to run their tests
Why run the QF-Test license server as a Windows service?
Running the QF-Test license server as a Windows service helps your Windows administration team ensure that the service starts automatically with the operating system, recovers after reboots, and can be monitored and controlled via standard Microsoft Windows tools:
- Automatic start and restart: Ensures the service is always available after a reboot or patch cycle.
- Standardized operations: Start, stop, and monitor via the Windows Services console (
services.msc). - Centralized logging: Find logs in one place for troubleshooting and auditing.
- Consistent behavior for CI/CD and distributed test automation.
Before you start: Prerequisites
- Administrator (elevated) rights on the Windows machine that will host the QF-Test license server
- Network access for clients to reach the license server
Prepare the QF-Test license server
- Install QF-Test using the official installer. Beyond the files in
C:\Program Files\QFS, the installer creates the folder%PROGRAMDATA%\QFS\QF-Testand configures the required access rights for license server administration. - Open the folder
%PROGRAMDATA%\QFS\QF-Testin Windows Explorer. Because%PROGRAMDATA%is typically hidden, paste%PROGRAMDATA%\QFS\QF-Testinto the Explorer address bar.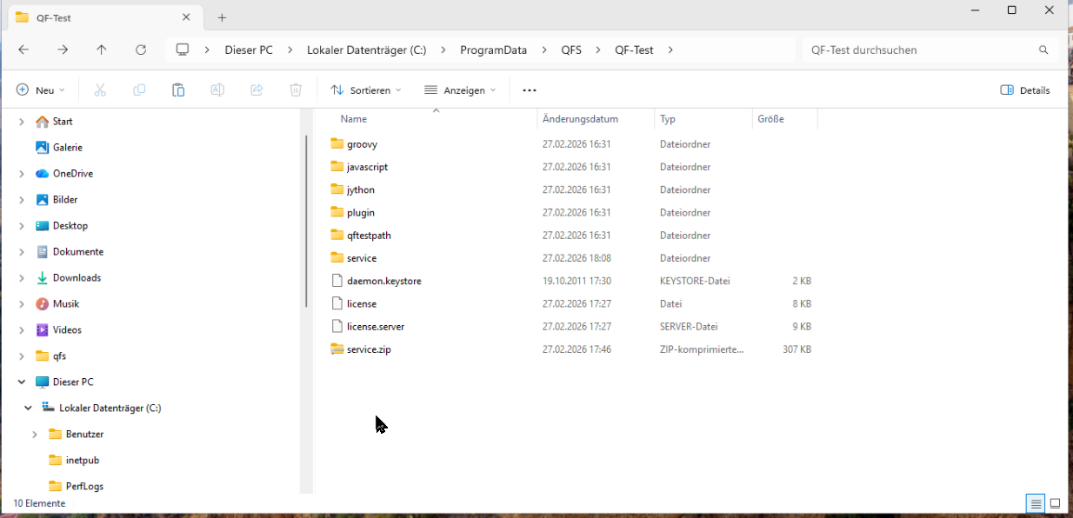
- Copy the following license files into that folder:
license(client license file, no extension like .dat or .txt)license.server(server license file)
- Verify access rights: The files and folder must grant read/write permissions to users who will administer the QF-Test license server. If you used the installer, these rights should already be inherited. If not, set them manually.
Set a secure password for the QF-Test license server
Setting a password is essential for two reasons:
Security: Do not rely on the default password (« secret »).
Initialization: Explicitly setting the password creates the passwd file used by the license server.
- In
%PROGRAMDATA%\QFS\QF-Test, open the Windows Terminal (PowerShell) by right-clicking in the Explorer window’s white area and selecting the terminal option.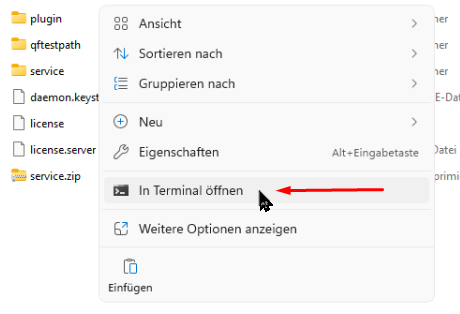
- After opening the Terminal, a PowerShell prompt appears.
- Run the following command (PowerShell syntax), replacing
your_passwordwith a strong password:
qftestc --userdir="$env:ProgramData\QFS\QF-Test" -batch -licenseserver -licenseserverSetpwd admin=your_password
After a few seconds, you should see a confirmation and the passwd file should appear in the folder. If the command fails, it is most likely due to insufficient permissions for %PROGRAMDATA%\QFS\QF-Test.
Install the QF-Test license server as a Windows service (winsw)
The QF-Test license server is not a native Windows service. To run it as one, you use a service wrapper. The approach described here uses winsw (a third-party Windows service wrapper). If your organization prefers a different wrapper, you can adapt the configuration accordingly. Capabilities vary by wrapper tool.
We are not the authors of
winsw. If there are any issues with this tool, we cannot provide support beyond this documentation. For details aboutwinsw, visit its GitHub page.
-
Download the prepared Service wrapper package
qftest-license-service.zip. -
Copy
qftest-license-service.zipto%PROGRAMDATA%\QFS\QF-Testand extract it. This creates aservicesubfolder:%PROGRAMDATA%\QFS\QF-Test\service. -
Open PowerShell and change into the « service » folder:
Set-Location service- or:
cd service
-
The folder contains a preconfigured
winswsetup:QF-TestLicenseServer.NET4.xml(winswconfiguration)QF-TestLicenseServer.NET4.exe(winsw.exerenamed for clarity)installService.ps1(PowerShell script to install the service)
-
Run the script:
.\installService.ps1If you see an error that script execution is disabled, bypass it for this command only:
PowerShell -ExecutionPolicy Bypass .\installService.ps1If your company policy blocks execution policy overrides, ask your administrator to enable third-party PowerShell scripts for your user or machine.
-
During installation:
- A Windows UAC prompt should request admin approval. Click « Yes ».
- A
cmd.exewindow may appear during the process. - After completion: You should see a confirmation that the QF-Test license server is installed as a Windows service.

Verify, operate, and maintain the service
- Verify: Open the Windows Services console (
services.msc) and look for « QF-Test License Server ». Use the context menu to start, stop, or restart the service.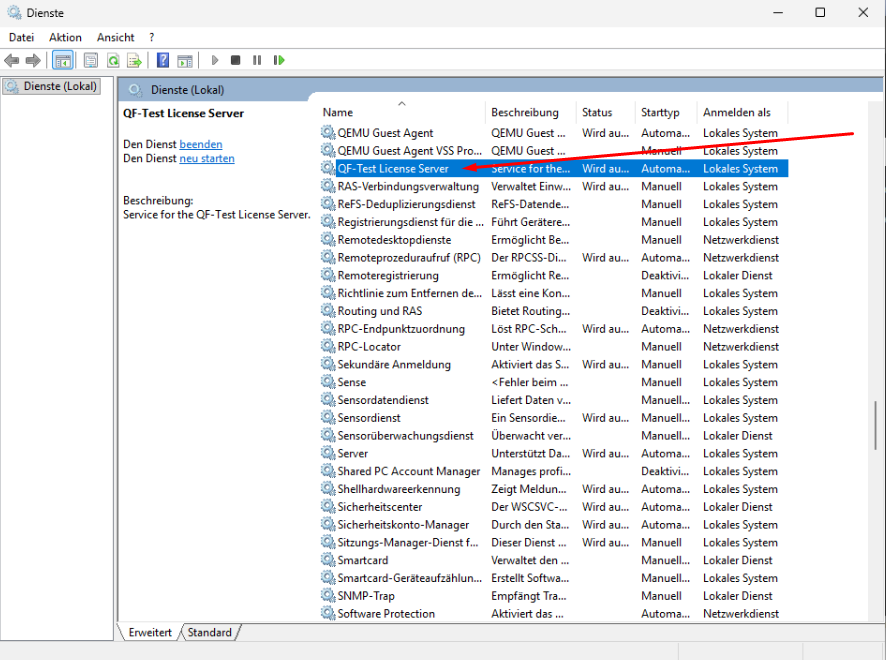
- Logs:
%PROGRAMDATA%\QFS\QF-Test\log - Additional scripts:
%PROGRAMDATA%\QFS\QF-Testincludes PowerShell scripts to start, stop, or uninstall the service. - Firewall: On first use of QF-Test, you may see a Windows Firewall dialog asking to allow the Java runtime (installed with QF-Test) to access your network. Allow this so clients can connect to your QF-Test license server.
- Documentation: For advanced administration, consult the QF-Test license server manual
Troubleshooting tips for Microsoft Windows environments
No UAC prompt appears
Your system may enforce stricter User Account Control settings. Contact your administrator to proceed with service installation.
« Script execution is disabled »
Use PowerShell -ExecutionPolicy Bypass .\installService.ps1 for a one-off run. If this is blocked by policy, ask your administrator to enable third-party PowerShell scripts for your user or machine.
Cannot set or change the password
Check permissions on %PROGRAMDATA%\QFS\QF-Test and ensure your account has read/write access.
Service starts before networking is available
The winsw configuration includes basic dependency handling so the service only starts when a network is attached. If using another wrapper, ensure equivalent behavior.
I prefer a different service wrapper
You can replace winsw with a wrapper of your choice. Adapt the configuration accordingly and ensure start/restart/stop and network dependency handling are covered.
Practical checklist for QF-Test in Windows-based test automation
- Install QF-Test via the official installer to preconfigure
%PROGRAMDATA%\QFS\QF-Testwith correct permissions. - Place
licenseandlicense.serverinto%PROGRAMDATA%\QFS\QF-Test. - Set the admin password using qftestc and confirm the
passwdfile is created. - Download and extract
qftest-license-service.zipto create the « service » subfolder and runinstallService.ps1. - Approve the UAC prompt, then verify the « QF-Test License Server » in services.msc.
- Allow the Windows Firewall prompt for the Java runtime bundled with QF-Test.
- Use
%PROGRAMDATA%\QFS\QF-Test\logfor diagnostics and the included PowerShell scripts for service lifecycle tasks.